
E-Bike Technology
Heybike Cityrun Electric Bike: Specs, Features, and Value

Introduction
Anyone shopping for a commuter e-bike eventually runs into the same wall: premium brands can cost three or four thousand dollars, and it’s hard to tell whether a cheaper option is actually well built or just well marketed. That’s usually why people search for the Heybike Cityrun specifically. They’ve seen it priced far below many name-brand city e-bikes and want to know if the components, range, and safety features actually hold up, or if corners were cut somewhere to hit that price.
This article breaks down what the Cityrun actually is, how its components work, where it makes sense as a daily commuter, and what to watch out for before buying one.
Direct Answer
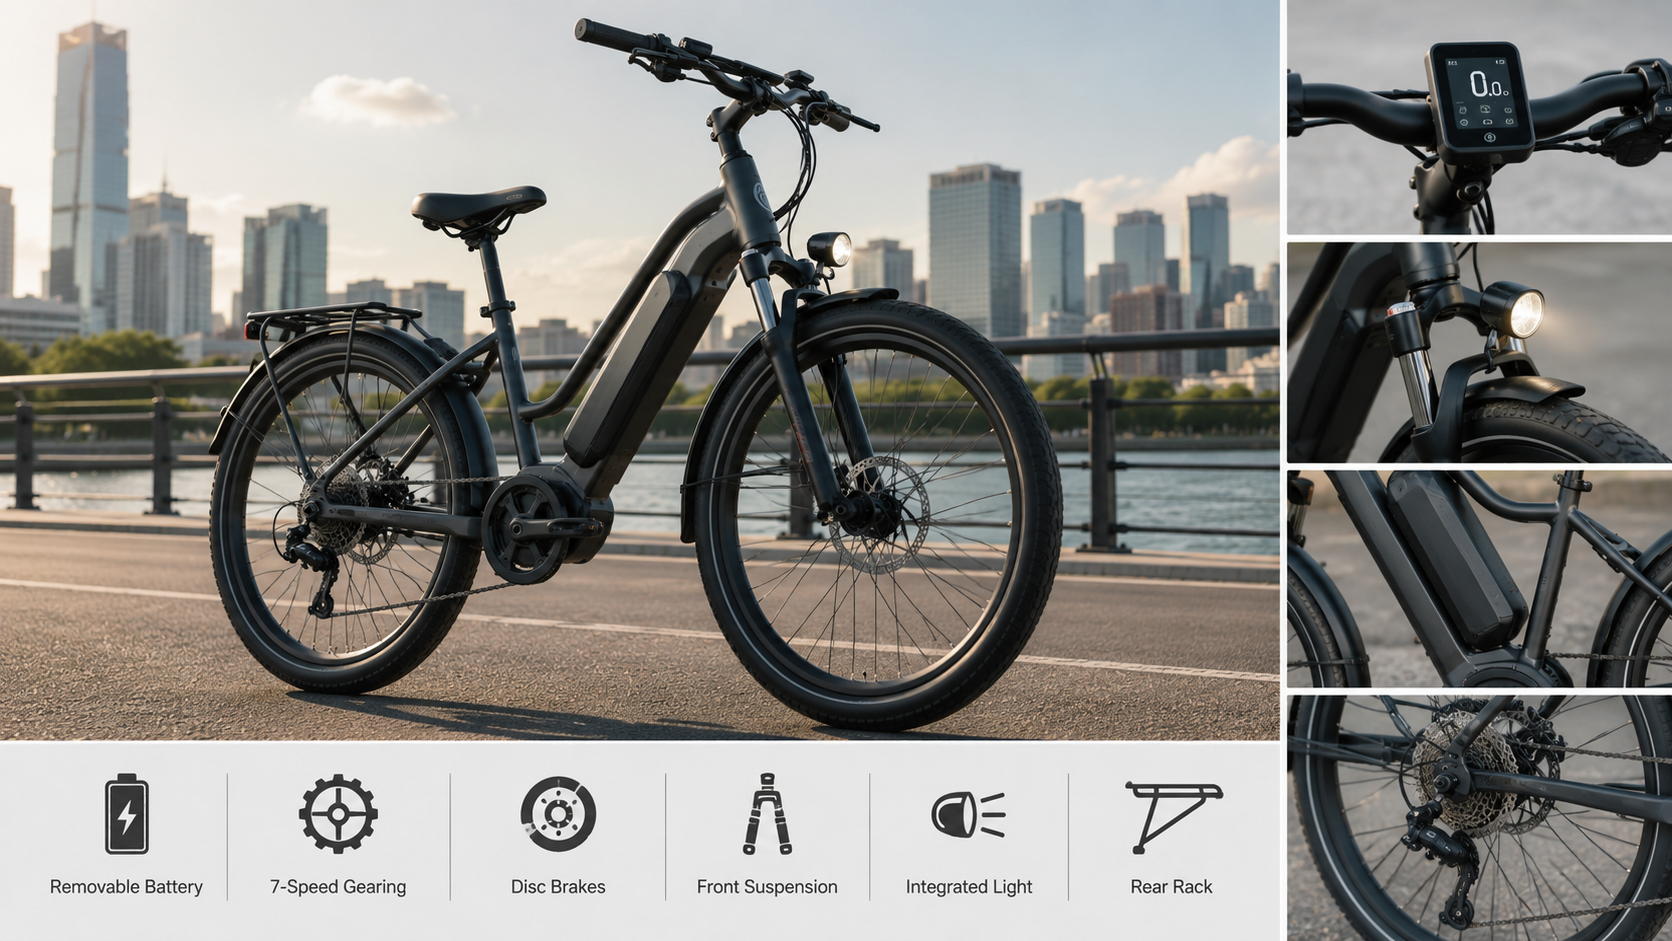
The Heybike Cityrun is a step-through commuter electric bike built around a 500-watt rear hub motor, a 720Wh removable battery, and a claimed range of roughly 30 to 55 miles depending on assist level and terrain. It includes hydraulic disc brakes, a front suspension fork, a Shimano 7-speed drivetrain, integrated turn signals, and app connectivity, positioning it as a feature-rich option in the sub-$1,500 e-bike category.
What Is the Heybike Cityrun?
The Cityrun is one of the commuter-focused models in Heybike’s lineup, a brand that builds direct-to-consumer electric bikes for city riding, folding portability, and light off-road use. The Cityrun specifically targets riders who want an upright, comfortable bike for getting to work, running errands, or riding around town without much physical effort required.
Its step-through aluminum alloy frame is the most noticeable design choice. Instead of a traditional top tube that a rider has to swing a leg over, the frame dips low in the middle, making it easier to mount and dismount. This design is common on commuter and cruiser-style e-bikes because it accommodates a wider range of riders, including those in regular clothing or with limited hip and knee mobility.
Key Specifications
Understanding the core specs helps put the Cityrun’s price and performance in context.
- Motor: 500W rear hub motor, with peak output reported between roughly 800W and 1000W depending on the model version
- Battery: 48V, 15Ah, 720Wh removable lithium-ion battery
- Range: Approximately 30 to 55 miles, depending on pedal-assist level, rider weight, and terrain
- Top speed: Varies by region and assist mode, generally falling in the 20 mph range on throttle-only power, with higher pedal-assist speeds reported in some listings
- Weight: About 62 pounds
- Weight capacity: Up to 350 pounds combined rider and cargo weight
- Tires: 26 x 2.5 inch
- Brakes: Hydraulic disc brakes with 180mm rotors
- Suspension: Front hydraulic suspension fork
- Drivetrain: Shimano 7-speed
- Display: LCD screen with Heybike app connectivity
- Lighting: Automatic LED headlight, LED taillight, and integrated turn signals
- Cargo: Rear rack rated for roughly 120 pounds, with additional basket accessories available
Because Heybike updates its lineup periodically, exact numbers can shift slightly between model years, so it’s worth double-checking current specs on the manufacturer’s page before purchasing.
How the Cityrun’s Components Work Together
Motor and Power Delivery
The 500W rear hub motor is mounted directly in the back wheel and pushes the bike forward as pedal assist engages or the throttle is used. A higher peak wattage, in this case up to around 800–1000W, means the motor can deliver short bursts of extra torque when accelerating from a stop or climbing a moderate incline, even though its continuous rated output is lower.
Battery and Real-World Range
The 720Wh battery capacity is calculated by multiplying voltage (48V) by amp-hours (15Ah). Larger Wh numbers generally translate to longer range, but the 30-to-55-mile spread reflects a real variable: range drops significantly at higher assist levels, on hilly terrain, or with a heavier rider. A commuter using low pedal assist on flat roads will land closer to the high end of that range, while someone relying mostly on throttle power in a hilly area will see numbers closer to the low end.
Braking System
Hydraulic disc brakes use fluid pressure instead of a cable to squeeze the brake pads, which generally provides stronger stopping power with less hand fatigue compared to mechanical disc brakes. They also require less routine adjustment over time, since brake cables aren’t stretching the way they would on a cable-actuated system.
Suspension
The front hydraulic suspension fork absorbs bumps from potholes, cracked pavement, and uneven surfaces, which matters more for daily city riders than it might seem. Suspension at this price point isn’t universal, and its presence reduces strain on the rider’s wrists and lower back over longer rides.
Drivetrain
The Shimano 7-speed drivetrain lets the rider shift gears manually in addition to adjusting motor assist level, which is useful for maintaining a comfortable pedaling cadence across different speeds and inclines, rather than relying on the motor alone.
Why This Combination of Features Matters
A lot of budget e-bikes cut costs by using mechanical disc brakes, a rigid front fork with no suspension, or a single-speed drivetrain. The Cityrun’s spec sheet bundles several features, hydraulic brakes, front suspension, and a multi-speed drivetrain, that are more commonly found on bikes priced significantly higher. This matters for buyers because it can mean fewer near-term upgrades or replacements, and a smoother, safer ride on imperfect city streets.
That said, spec sheets don’t tell the whole story. Component quality, factory assembly consistency, and long-term durability matter just as much as which parts are listed, and those factors are harder to evaluate from a listing alone.
Benefits of the Cityrun
Comfortable, accessible frame design that suits a wide range of riders, including those who prefer stepping through rather than over the frame.
Strong braking performance from hydraulic disc brakes, which is not always standard at this price point.
Smoother ride quality thanks to the front suspension fork, especially over rough or poorly maintained roads.
Reasonable cargo capacity for errands, with a rear rack and optional basket accessories.
App and display integration for tracking ride data and adjusting settings without needing third-party accessories.
Limitations and Considerations
Weight makes it less portable. At roughly 62 pounds, the Cityrun is not a bike you’ll want to carry up several flights of stairs regularly. It’s built for riders with ground-level or elevator-accessible storage.
Range estimates depend heavily on conditions. The advertised 30-to-55-mile range should be treated as a spread rather than a guarantee, since assist level, hills, wind, and rider weight all affect the real number.
Top speed and classification vary by market. E-bike speed classifications differ by state and country, and how a specific unit is configured can affect where it’s legally allowed to be ridden, such as certain bike paths or trails.
Self-assembly is required. Like most direct-to-consumer e-bikes, the Cityrun ships partially disassembled, and proper assembly, especially of the brakes and wheels, is essential for safe riding.
Long-term parts availability. Because Heybike sells online rather than through a wide network of physical bike shops, sourcing replacement parts or specialized service may take more effort than it would with a locally available brand.
Step-by-Step: What to Expect When Setting Up the Cityrun
- Unbox and inventory parts. Most Cityrun shipments include the partially assembled frame, front wheel, pedals, handlebars, seat post, and included accessories like fenders and a rack.
- Attach the front wheel and handlebars. These are typically the two main components that need to be mounted before the bike is rideable.
- Install pedals and seat height. Pedals are threaded on one side reversed from the other, so it’s important to follow the included instructions to avoid cross-threading.
- Charge the battery fully before the first ride. This ensures an accurate baseline for range testing and confirms the battery and charger are functioning correctly.
- Check brake and tire pressure before riding. Since brakes are safety-critical, verifying they engage properly and that cables or hydraulic lines are seated correctly is an essential final step.
- Pair the Heybike app, if desired. This step is optional but allows riders to track mileage, monitor battery health, and adjust certain settings.
- Take a short test ride in a controlled area. Before commuting in traffic, a short ride in a parking lot or quiet street helps confirm brakes, gears, and assist levels are functioning as expected.
Common Mistakes and Misconceptions
Assuming the top-end range applies to every ride. The 55-mile figure typically reflects the lowest assist setting on flat terrain with a lighter rider, not a guaranteed number for daily commuting with hills or higher assist levels.
Treating peak motor wattage as continuous power. The Cityrun’s peak wattage figure represents a short burst capability, not the sustained output the motor delivers over a long ride.
Skipping the post-assembly safety check. Shipping and vibration during transit can loosen bolts or shift components, so checking brakes, wheel security, and handlebar tightness before the first ride is a step some new owners skip.
Confusing step-through frames with reduced durability. A step-through design is a geometry choice for accessibility, not an indication of a weaker frame; reinforcement in the frame’s lower section is typically engineered to compensate for the open design.
Assuming turn signals replace hand signals or traffic awareness. Integrated turn signals add visibility, but they don’t replace standard road awareness or, in many areas, legally required hand signals for cyclists.
Real-World Example
Consider a commuter riding four miles each way to work on mostly flat city streets, with occasional stops at intersections. Using a mid-level pedal-assist setting, this rider would likely land in the middle of the advertised range, comfortably covering a round trip with battery to spare, while benefiting from the hydraulic brakes at frequent stop-and-go intersections.
Compare that to a rider in a hillier suburb who relies more heavily on throttle power to avoid arriving at work sweaty. This rider would likely see noticeably shorter range per charge and may need to charge more frequently, even though both riders own the same bike.
Key Facts
- The Cityrun is part of Heybike’s commuter e-bike lineup, built around a step-through aluminum frame.
- It uses a 500W rear hub motor with peak output reported up to around 800–1000W.
- The battery is a 720Wh (48V, 15Ah) removable lithium-ion pack.
- Advertised range spans roughly 30 to 55 miles, depending on conditions.
- It includes hydraulic disc brakes, a front suspension fork, and a Shimano 7-speed drivetrain.
- Weight capacity is rated at up to 350 pounds combined rider and cargo weight.
- The bike weighs approximately 62 pounds.
FAQ
What is the Heybike Cityrun?
It’s a step-through commuter electric bike from Heybike, built with a 500W motor, hydraulic disc brakes, front suspension, and app connectivity for daily city riding.
How does the Cityrun’s motor work?
The rear hub motor assists pedaling at adjustable levels and can also be engaged via throttle, with peak output reserved for short bursts like accelerating from a stop.
Why do people choose a step-through frame like this?
Step-through frames make mounting and dismounting easier, which appeals to riders who want a more accessible, comfortable riding position for everyday use.
Is the Cityrun safe to ride?
When properly assembled and maintained, the hydraulic disc brakes and front suspension contribute to safe, stable handling, though safety also depends on correct assembly, tire condition, and rider awareness of local traffic laws.
Is it legal to ride on bike paths and roads?
Legality depends on local e-bike classification rules, which are based on motor wattage and top speed. Riders should confirm their local regulations before using bike lanes, sidewalks, or trails.
What are the alternatives to the Cityrun?
Alternatives include other Heybike commuter models with different frame styles, competing direct-to-consumer e-bike brands, and premium e-bike brands sold through physical retail stores with in-person support.
What should buyers know before purchasing?
Buyers should understand that real-world range varies with terrain and rider weight, that the bike requires self-assembly, and that its roughly 62-pound weight makes it better suited to ground-level storage than apartments requiring stair-carrying.
Key Takeaways
- The Heybike Cityrun is a step-through commuter e-bike with a 500W motor and 720Wh removable battery.
- Advertised range falls between roughly 30 and 55 miles, depending on assist level and terrain.
- It includes hydraulic disc brakes, front suspension, and a Shimano 7-speed drivetrain, features not always found at this price point.
- At about 62 pounds, it’s better suited to riders with ground-level bike storage.
- Proper assembly and a post-setup safety check matter for safe first rides.
- Local e-bike classification laws determine where the bike can legally be ridden.
Conclusion
The Heybike Cityrun combines a comfortable step-through frame with hydraulic brakes, front suspension, and a multi-speed drivetrain, a feature set that stands out in its price range. Riders considering it should weigh its real-world range against their commute distance and terrain, plan for at-home assembly, and confirm local e-bike rules before relying on it as a daily replacement for driving or transit.

Introduction
Most cyclists have felt it without knowing exactly why: a ride that feels sluggish and heavy one day, then bouncy and unstable the next, even on the same bike and the same road. Tire pressure is usually the reason. It’s one of the simplest things to adjust on a bicycle, yet it has an outsized effect on comfort, speed, grip, and even how likely you are to get a flat.
This guide covers what bicycle tire pressure actually means, how to find the right number for your setup, and the mistakes that trip up even experienced riders.
Direct Answer
Bicycle tire pressure is the amount of air, measured in PSI (pounds per square inch) or bar, inside a bike tire. The right pressure depends on tire width, rider weight, and terrain, but general ranges run from about 25–50 PSI for wide mountain bike tires, 40–70 PSI for hybrid and gravel tires, and 80–130 PSI for narrow road bike tires. Checking the sidewall for the manufacturer’s recommended range is the most reliable starting point.
What Is Bicycle Tire Pressure?
Bicycle tire pressure refers to how much compressed air sits inside a tire, measured most commonly in PSI in the United States or bar in many other countries. That air pressure supports the rider’s weight, absorbs impacts from the road or trail, and determines how much of the tire’s surface makes contact with the ground.
Unlike car tires, which usually operate within a narrow, standardized pressure range, bicycle tires cover an enormous span, from under 20 PSI on some fat-tire setups to well over 100 PSI on narrow racing tires. That range exists because bicycles vary so widely in tire width, intended use, and rider weight.
Why Tire Pressure Matters
Tire pressure affects a bike in several interconnected ways, and understanding each one makes it easier to know when and why to adjust it.
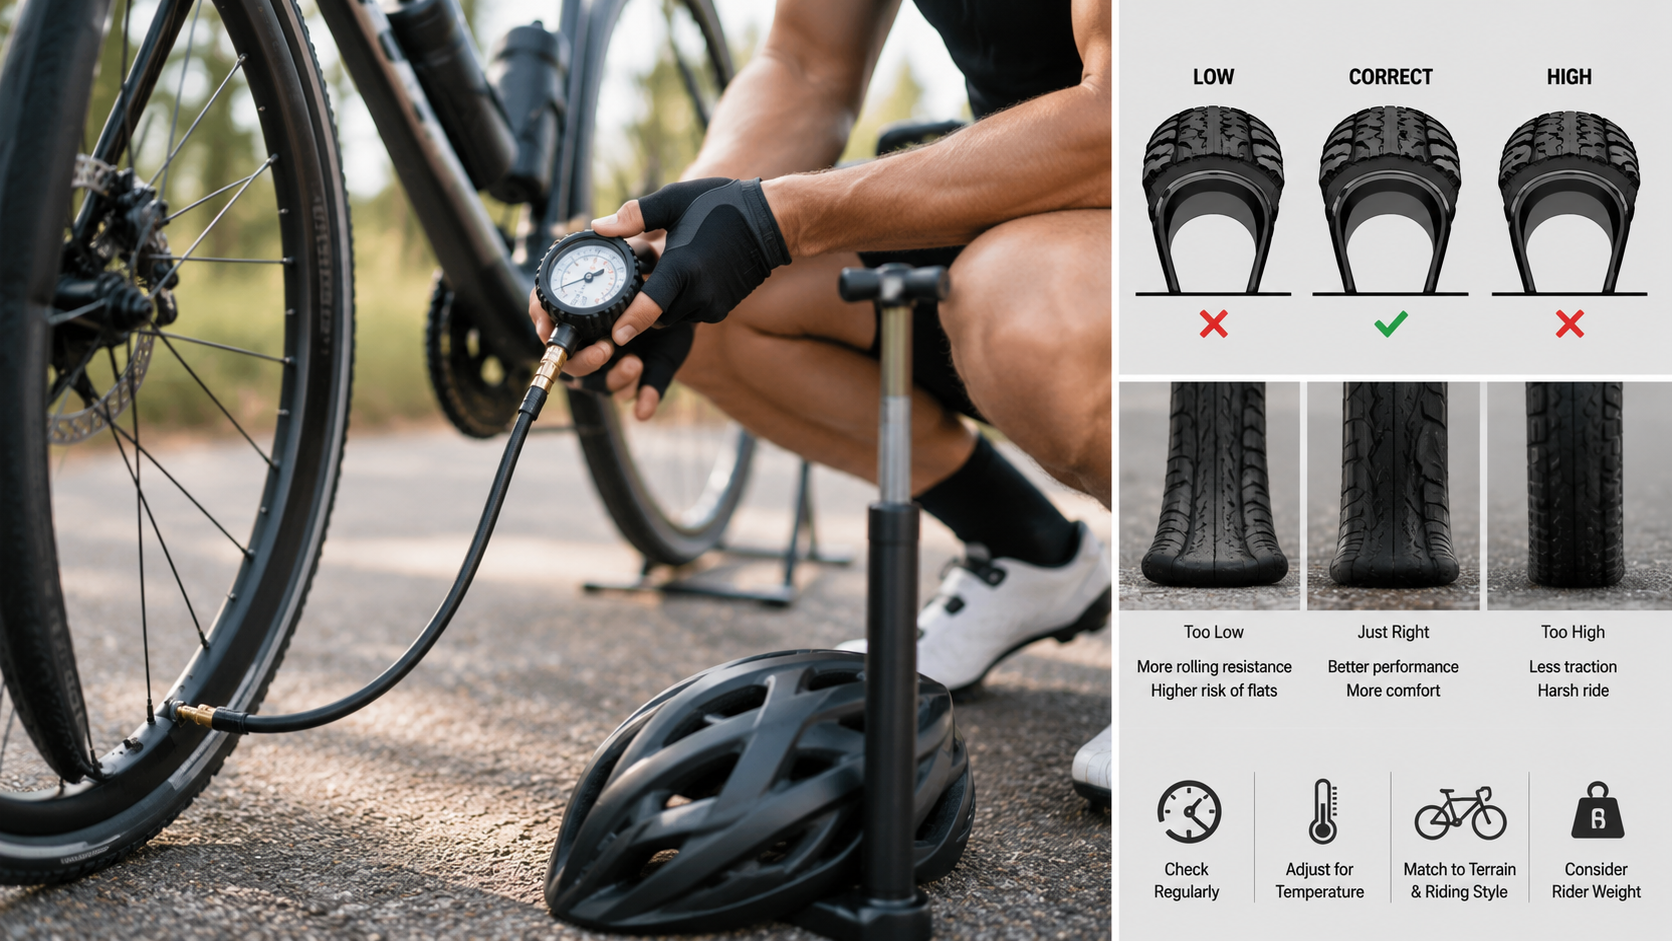
Rolling resistance: Higher pressure generally reduces the tire’s contact patch with the ground, which can lower rolling resistance on smooth pavement. This is why road cyclists have traditionally run higher pressures for speed.
Comfort and vibration damping: Lower pressure allows the tire to absorb more shock from bumps, cracks, and rough surfaces, which reduces vibration transmitted to the rider’s hands, seat, and joints.
Traction and cornering grip: A properly inflated tire deforms slightly under load, increasing contact with the surface for better grip. Overinflated tires can bounce over small irregularities instead of gripping them, reducing traction, especially on loose or uneven terrain.
Pinch flat risk: Underinflated tires are more likely to suffer pinch flats, where the inner tube gets compressed between the rim and a hard impact like a pothole edge, causing two puncture holes often described as a snakebite pattern.
Tire and rim wear: Consistently running pressure too low or too high accelerates wear on the tire sidewall or, in some cases, stresses the rim in ways that shorten its lifespan.
Key Concepts to Understand
PSI (pounds per square inch): The most common unit for tire pressure in the US, referring to how much force the air exerts per square inch of the tire’s inner surface.
Bar: A metric unit for pressure used in many countries outside the US. One bar is roughly equal to 14.5 PSI.
Tire width: Measured in millimeters or inches, tire width has a major effect on ideal pressure. Wider tires need less pressure to support the same rider weight because they have more contact area and volume.
Tubeless setup: A tire and rim system that doesn’t use an inner tube, sealed instead with liquid sealant. Tubeless tires can typically run at lower pressures than tubed tires without as much pinch flat risk, since there’s no tube to pinch.
Maximum and minimum pressure: Tire manufacturers print a recommended pressure range on the sidewall, which reflects safe operating limits for that specific tire’s construction, not just a general suggestion.
How to Find the Right Tire Pressure
Check the Sidewall First
Nearly every bicycle tire has a printed pressure range on its sidewall, usually shown as a minimum and maximum PSI or bar value. This range is set by the manufacturer based on the tire’s construction and intended use, and it’s the most reliable starting point before making further adjustments.
Match Pressure to Tire Type and Width
Road bike tires (23–32mm wide): Typically run between 80 and 130 PSI, with narrower tires generally needing higher pressure than wider ones to support the same load.
Gravel and hybrid tires (32–45mm wide): Usually fall between 40 and 70 PSI, balancing rolling efficiency on pavement with comfort and grip on unpaved surfaces.
Mountain bike tires (2.1–2.6 inches wide): Commonly run between 25 and 50 PSI, with lower pressures favored for technical terrain requiring extra traction and higher pressures favored for faster, smoother trails.
Fat bike tires (3.8 inches or wider): Often run under 15 PSI, sometimes as low as 5 PSI on snow or sand, since the extremely wide tire volume allows very low pressure without the tire folding over during cornering.
Adjust for Rider Weight
Heavier riders generally need higher pressure within the tire’s recommended range to prevent the tire from compressing too far under load, which increases pinch flat risk and can affect handling. Lighter riders can often run pressure toward the lower end of the range for better comfort and grip without added flat risk.
Adjust for Terrain and Conditions
Smooth, dry pavement generally favors pressure toward the higher end of the range for efficiency. Wet roads, loose gravel, or technical trail sections often benefit from pressure toward the lower end, since a slightly softer tire conforms better to irregular surfaces and grips more consistently.
Step-by-Step: How to Check and Adjust Tire Pressure
- Find the tire’s recommended range printed on the sidewall.
- Attach a pressure gauge or pump with a built-in gauge to the tire’s valve, either Presta or Schrader, matching the pump head to the valve type.
- Read the current pressure before adding or releasing air, so you know your starting point.
- Add air gradually, checking the gauge periodically rather than guessing based on how firm the tire feels by hand.
- Compare the reading to your target pressure, based on tire width, rider weight, and terrain.
- Recheck pressure regularly, ideally before every ride or at least weekly, since bicycle tires lose air gradually over time even without a puncture.
- Adjust seasonally if needed, since temperature changes can affect tire pressure, with cold weather generally lowering PSI slightly compared to summer conditions.
Common Mistakes and Misconceptions
Assuming higher pressure is always faster. While higher pressure can reduce rolling resistance on smooth pavement, tires overinflated beyond the ideal range for the surface can actually slow the bike down by bouncing over small bumps instead of rolling smoothly through them.
Judging pressure by squeezing the tire. Hand-feel is unreliable and varies by tire construction, so relying on a gauge gives a far more consistent and accurate reading than pressing a thumb into the tire.
Ignoring the sidewall’s printed range. Some riders default to a pressure they’ve always used regardless of tire width or type, which can lead to underinflation or overinflation depending on the specific tire installed.
Forgetting that tires lose pressure over time. Even without a puncture, bicycle tires, especially high-pressure road tires, can lose several PSI per week just from natural air permeation through the tube or tire material.
Assuming tubeless and tubed tires use the same ideal pressure. Tubeless setups can often run lower pressure safely since there’s no tube to pinch, so applying tubed-tire pressure habits to a tubeless setup may mean running unnecessarily high pressure.
Real-World Examples
A commuter riding a hybrid bike with 35mm tires on mostly paved city streets might run around 55 PSI, balancing efficient rolling with enough cushioning to handle potholes and rough pavement seams comfortably.
A mountain biker heading out on a rocky, technical trail might drop pressure to around 28 PSI in a 2.4-inch tire, trading a small amount of rolling efficiency for improved traction and shock absorption over roots and rocks.
A lighter road cyclist riding smooth pavement on 25mm tires might run closer to 90 PSI rather than the tire’s maximum rated 120 PSI, since their lower body weight doesn’t require maximum pressure to avoid pinch flats, and the slightly lower pressure improves comfort and grip.
Key Facts
- Tire pressure is measured in PSI or bar, with 1 bar roughly equal to 14.5 PSI.
- Every bicycle tire has a manufacturer-recommended pressure range printed on the sidewall.
- Wider tires generally require lower pressure than narrower tires to support the same rider weight.
- Underinflated tires increase the risk of pinch flats, especially on hard impacts like potholes or curbs.
- Overinflated tires can reduce traction and comfort, particularly on rough or loose surfaces.
- Tubeless tire setups can typically run lower pressure than tubed setups without increasing flat risk.
- Tire pressure decreases gradually over time, even without a puncture, so regular checks are necessary.
FAQ
What is bicycle tire pressure?
It’s the amount of compressed air inside a bike tire, measured in PSI or bar, which affects rolling resistance, comfort, traction, and flat resistance.
How do I know the right tire pressure for my bike?
Check the pressure range printed on the tire’s sidewall first, then adjust within that range based on your weight, tire width, and the terrain you typically ride.
Why does tire pressure matter so much?
It directly affects how a bike rolls, how much vibration reaches the rider, how well the tire grips the surface, and how likely the tire is to suffer a pinch flat.
Is it safe to ride with low tire pressure?
Riding well below the tire’s minimum recommended pressure increases the risk of pinch flats and can make handling feel vague or unstable, so it’s not advisable for regular riding, even though very low pressures are intentionally used in specific contexts like fat biking on snow.
Is there a legal requirement for tire pressure?
No, there’s no legal minimum or maximum tire pressure requirement for bicycles in most places, though staying within the manufacturer’s printed range is the standard safety guideline.
What are the alternatives to a standard pressure gauge?
Some pumps include built-in gauges, and digital tire pressure gauges are also available separately for more precise readings than judging pressure by feel.
What should riders know before adjusting tire pressure?
Riders should know their tire’s printed pressure range, their approximate riding weight, and the type of terrain they’ll be riding on, since all three factors combine to determine the ideal pressure for a given ride.
Key Takeaways
- Bicycle tire pressure is measured in PSI or bar and directly affects speed, comfort, grip, and flat resistance.
- The manufacturer’s recommended range, printed on the tire sidewall, is the best starting point for any tire.
- Wider tires generally need lower pressure than narrower tires to support the same rider weight.
- Terrain matters: smoother surfaces generally favor higher pressure, while rougher or looser surfaces often benefit from lower pressure.
- Tubeless tires can often run lower pressure safely compared to tubed setups.
- Checking pressure regularly matters, since tires lose air gradually even without a puncture.
Conclusion
Bicycle tire pressure isn’t a single universal number, it’s a range that depends on tire width, rider weight, and the terrain being ridden. Starting with the pressure printed on the tire’s sidewall and adjusting from there based on real riding conditions gives a far more reliable result than guessing by feel or copying a number used for a completely different bike or tire.
E-Bike Technology
When Was the Bicycle Invented? A Complete Timeline From First Design to Modern Form
Introduction
It’s a simple question with a surprisingly layered answer. Ask when the bicycle was invented, and the honest response depends on what you mean by “bicycle.” The first two-wheeled riding machine and the bicycle as we recognize it today, with pedals, gears, and a chain, are separated by nearly 70 years of incremental invention, failed designs, and competing claims.
This guide walks through that timeline in order, explaining not just the dates but why each step mattered. Understanding how the bicycle evolved makes the answer to “when was it invented” much clearer, and a lot more interesting, than a single date could capture on its own.
Direct Answer: When Was the Bicycle Invented?
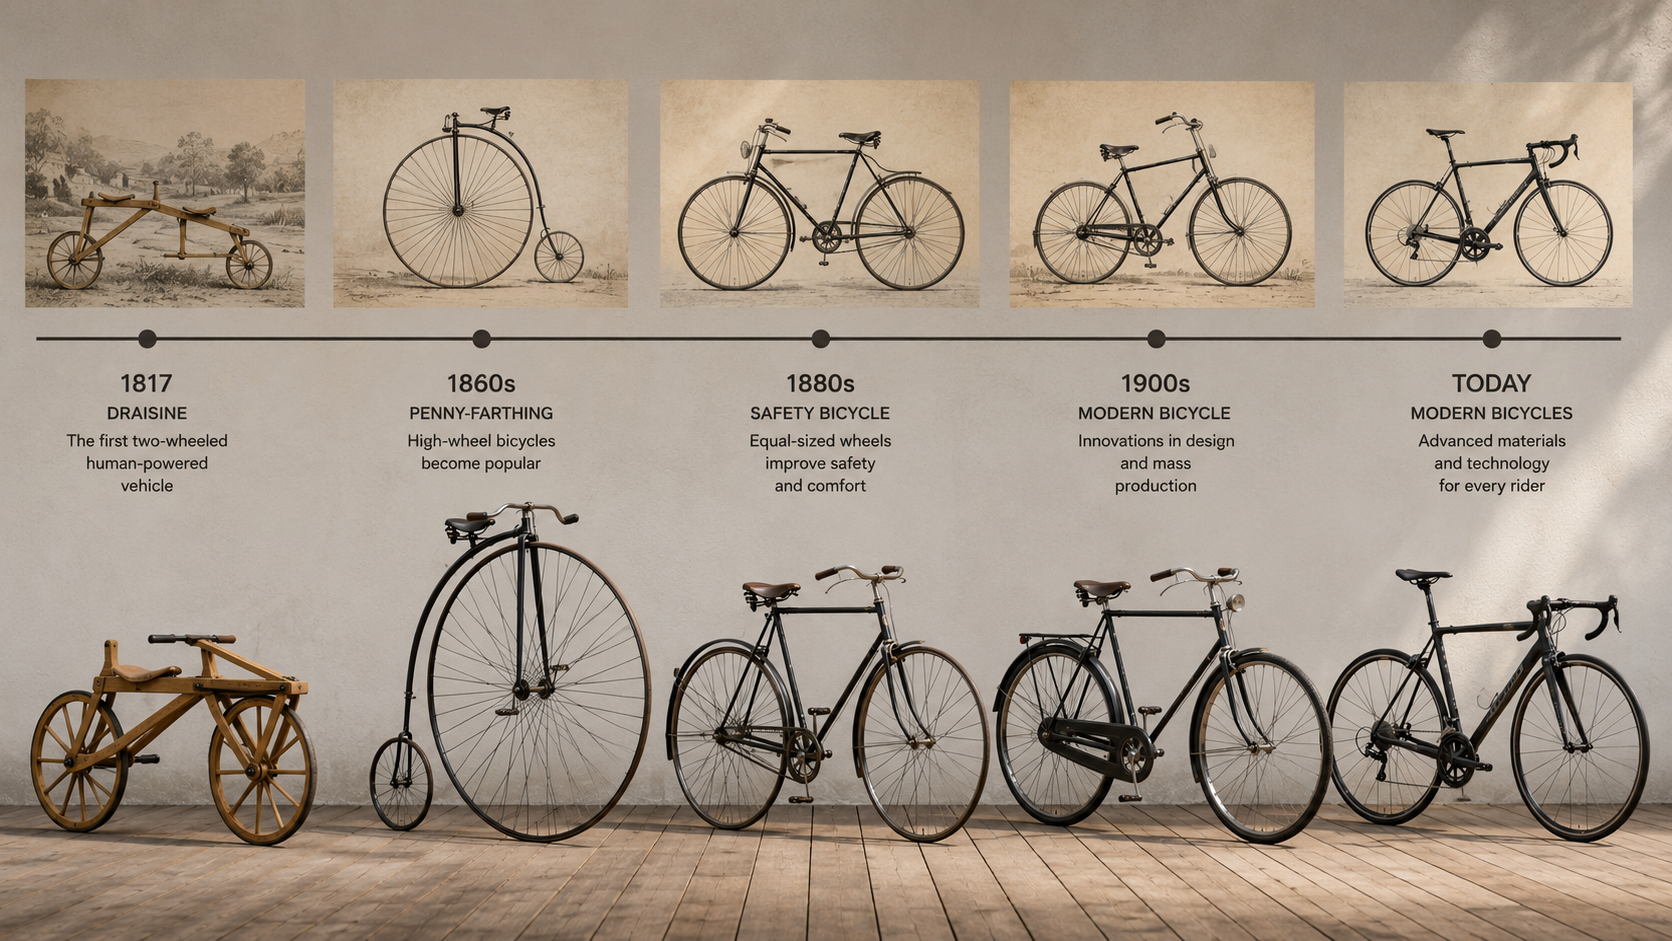
The bicycle’s direct ancestor, a two-wheeled steerable machine called the Laufmaschine, was invented by German inventor Karl von Drais in 1817. It had no pedals and was propelled by pushing the feet against the ground. Pedals weren’t added until the 1860s, and the bicycle didn’t reach its modern form, with a chain-driven rear wheel and equal-sized wheels, until the “safety bicycle” was introduced in 1885.
The First Step: Karl von Drais and the Laufmaschine (1817)
The earliest recognized ancestor of the bicycle was built by Karl von Drais, a German baron and civil servant working as a forester for the Grand Duke of Baden. On June 12, 1817, Drais rode his invention, called the Laufmaschine, or “running machine,” on a roughly 8 to 9 mile round trip between Mannheim and the nearby town of Schwetzingen, completing the ride in about an hour.
The Laufmaschine had two wheels aligned front to back, a steerable front wheel, and a wooden frame the rider straddled. It had no pedals. Instead, riders propelled themselves by pushing their feet against the ground, similar to walking or running while seated. Despite lacking pedals, this design introduced two features essential to every bicycle since: two in-line wheels and a steerable front wheel.
Drais patented his design in Baden in 1818, and the machine quickly became known by several names across Europe, including the draisine, the velocipede, and, somewhat mockingly, the “dandy horse” or “hobby horse,” a nickname referencing its popularity among wealthy young men. The craze reached the United States by 1818, where it was displayed publicly and became a novelty among riders in eastern cities.
Why the Laufmaschine Didn’t Catch On Long-Term
Despite its early popularity, the Laufmaschine faded from widespread use fairly quickly. It was expensive to produce, impractical on anything other than smooth, well-maintained paths, and physically tiring to ride over long distances, since all forward motion still relied entirely on the rider’s legs pushing against the ground. For roughly 50 years after Drais’s original ride, bicycle development largely stalled.
Adding Pedals: The Velocipede Era (1860s)
The next major leap came in the 1860s, when pedals were added directly to the front wheel of a two-wheeled machine, eliminating the need to push off the ground with the feet. This innovation is most commonly credited to Pierre Michaux, a French metalworker, who introduced his pedal-equipped “velocipede” around 1867, though the exact origin and sequence of who first attached pedals to a two-wheeler remains debated among historians, with a French inventor named Pierre Lallement also central to competing claims and patent filings from the same period.
The velocipede used pedals mounted directly to the front wheel’s axle, meaning one full rotation of the pedals equaled one full rotation of the wheel. This design became known informally as the “boneshaker,” a nickname earned from its rigid iron-and-wood frame and metal-rimmed wheels, which transmitted every bump in the road directly to the rider. Despite the discomfort, the velocipede entered mass production and became genuinely popular, marking the first time a pedal-driven two-wheeler reached a wide consumer market.
The High-Wheel Era: The Penny-Farthing (1870s)
Following the velocipede, inventors sought ways to increase speed without significantly increasing pedaling effort. Since pedals were still directly connected to the front wheel’s axle, the only practical way to travel faster per pedal rotation was to make the front wheel larger. This led to the high-wheel bicycle, commonly known today as the penny-farthing, named after the size difference between a British penny coin and the much smaller farthing coin.
Penny-farthings featured a dramatically oversized front wheel, sometimes exceeding 50 inches in diameter, with a much smaller trailing rear wheel. While faster than the velocipede, these bicycles were notoriously difficult to mount, dismount, and balance, and a forward fall over the handlebars, known at the time as “taking a header,” was a common and often serious hazard. Because of the skill and physical risk involved, penny-farthings remained mostly a pursuit of athletic young men rather than a practical transportation option for the general public.
The Modern Form: The Safety Bicycle (1885)
The design that finally resembles a modern bicycle arrived with the “safety bicycle,” widely credited to English inventor John Kemp Starley, who introduced his Rover Safety Bicycle in 1885. This design abandoned the oversized front wheel entirely in favor of two similarly sized wheels, with power transmitted from the pedals to the rear wheel through a chain-and-sprocket system rather than a direct pedal-to-wheel connection.
This change mattered enormously. It allowed for meaningful speed and mechanical efficiency without requiring an enormous, unstable front wheel, dramatically lowering the center of gravity and making the bicycle far safer and easier to ride for a general audience, hence the name. The safety bicycle’s chain-drive system is the same basic mechanical principle used in bicycles today.
The Final Piece: Pneumatic Tires (1888)
Shortly after the safety bicycle’s introduction, Scottish inventor John Boyd Dunlop developed a practical pneumatic, or air-filled, rubber tire in 1888. Earlier bicycles used solid rubber or metal-rimmed wheels, which transmitted significant road vibration to the rider. Pneumatic tires absorbed shock far more effectively, dramatically improving comfort and making longer rides more practical. Combined with the safety bicycle’s frame design, this innovation essentially completed the transition to the bicycle recognized today.
Why the Timeline Matters: Separating Precursor From Invention
A common point of confusion is treating “when was the bicycle invented” as a single moment rather than a sequence of connected innovations. Each stage solved a specific limitation of the version before it:
- Drais’s 1817 Laufmaschine introduced the two-wheeled, steerable concept, but required foot-powered propulsion.
- The 1860s velocipede added pedals, but connected them directly to the front wheel, limiting speed and comfort.
- The 1870s penny-farthing increased speed through wheel size, but sacrificed safety and accessibility.
- The 1885 safety bicycle introduced chain-driven rear-wheel propulsion with two similarly sized wheels, solving both the safety and mechanical efficiency problems.
- The 1888 pneumatic tire addressed the remaining comfort issue, completing the modern bicycle’s core design.
Understanding this sequence explains why different sources sometimes give different answers to “when was the bicycle invented.” A source focused on the concept of a two-wheeled personal vehicle will point to 1817. A source focused on the recognizable modern bicycle will point to 1885 or later.
Common Mistakes and Misconceptions
Assuming a single person invented the bicycle. The bicycle developed through contributions from multiple inventors across roughly seven decades, including Karl von Drais, Pierre Michaux, Pierre Lallement, John Kemp Starley, and John Boyd Dunlop, each solving a different limitation of earlier designs.
Believing Drais’s 1817 machine had pedals. The Laufmaschine was propelled entirely by the rider’s feet pushing against the ground. Pedals weren’t added to a two-wheeled design until roughly 50 years later, in the 1860s.
Confusing the penny-farthing with the first bicycle. While iconic, the high-wheel penny-farthing was a mid-development stage, appearing decades after Drais’s original design and roughly a decade before the safety bicycle that established the modern form.
Overlooking the pneumatic tire’s role. Many timelines focus only on frame and drivetrain design, but Dunlop’s 1888 pneumatic tire was essential to making bicycles genuinely comfortable and practical for everyday use, not just fast or mechanically efficient.
Assuming velocipede and safety bicycle are the same thing. The velocipede used direct pedal-to-wheel power on the front wheel, while the safety bicycle introduced chain-driven rear-wheel propulsion. These are distinct mechanical systems separated by roughly two decades of development.
Real-World Examples
A museum exhibit tracing bicycle evolution. Exhibits marking the anniversary of Drais’s original ride, such as those held in Mannheim, Germany, typically display the progression from the Laufmaschine through the velocipede, penny-farthing, and safety bicycle, illustrating how each design addressed a specific limitation of the one before it.
A cyclist researching why modern bikes use chain drives. Someone curious why bicycles use a chain rather than direct pedal-to-wheel power can trace that design choice directly back to the 1885 safety bicycle, which solved the speed and stability limitations of earlier direct-drive designs like the velocipede and penny-farthing.
A student researching invention timelines. Someone tracing the history of transportation innovation would find the bicycle’s development as a useful example of how a single invention often results from many incremental improvements rather than one isolated breakthrough.
Key Facts
- Karl von Drais rode the first recorded two-wheeled steerable vehicle on June 12, 1817, covering roughly 8 to 9 miles.
- Drais’s Laufmaschine had no pedals and was propelled by pushing the feet against the ground.
- Pedals were added to the front wheel in the 1860s, most notably by Pierre Michaux, creating the “velocipede,” also called the boneshaker.
- The penny-farthing high-wheel bicycle emerged in the 1870s to increase speed through a larger front wheel.
- John Kemp Starley introduced the chain-driven “safety bicycle” in 1885, establishing the frame design used in modern bicycles.
- John Boyd Dunlop developed a practical pneumatic tire in 1888, completing the core design still used today.
Frequently Asked Questions
When was the bicycle invented?
The bicycle’s direct ancestor, Karl von Drais’s Laufmaschine, was invented in 1817. The modern bicycle form, with pedals, a chain drive, and two similarly sized wheels, developed gradually and reached its recognizable shape with the 1885 safety bicycle.
How does the bicycle’s early design work?
The first design, the Laufmaschine, used two in-line wheels with a steerable front wheel, propelled by the rider pushing their feet against the ground rather than pedaling.
Why is the bicycle’s invention important?
It represented the first practical form of independent personal transportation that didn’t rely on animals, later evolving into a low-cost, efficient mode of transport still widely used worldwide today.
Was the early bicycle safe to ride?
Not particularly. The velocipede’s rigid frame earned it the nickname “boneshaker,” and the later penny-farthing’s oversized front wheel made falls, sometimes serious ones, a common risk. The 1885 safety bicycle was specifically designed to address these safety concerns.
Is the modern bicycle design still based on 19th-century inventions?
Yes. The chain-driven rear wheel and roughly equal-sized wheels introduced by the 1885 safety bicycle, combined with the pneumatic tire introduced in 1888, remain the core mechanical principles used in most bicycles today.
What came before the bicycle?
Before Drais’s 1817 Laufmaschine, personal transportation relied on animals, such as horses, or vehicles pulled by animals. There was no earlier self-propelled, two-wheeled personal vehicle recognized as a direct predecessor to the bicycle.
What should someone know about the bicycle’s invention history?
It’s useful to understand that no single date fully answers the question, since the bicycle evolved through distinct stages, from Drais’s pedal-less 1817 design to the pedal-equipped velocipede, the high-wheel penny-farthing, and finally the chain-driven safety bicycle that established the modern form.
Key Takeaways
- Karl von Drais’s 1817 Laufmaschine is considered the bicycle’s earliest direct ancestor, though it lacked pedals.
- Pedals were added to the front wheel in the 1860s, creating the velocipede, also known as the boneshaker.
- The 1870s penny-farthing increased speed through an oversized front wheel but sacrificed safety and accessibility.
- The 1885 safety bicycle introduced chain-driven rear-wheel propulsion, establishing the modern bicycle’s core design.
- The 1888 pneumatic tire, developed by John Boyd Dunlop, completed the transition to the bicycle recognized today.
Conclusion
The bicycle wasn’t invented in a single moment, but built gradually across nearly seven decades, from Karl von Drais’s pedal-less 1817 Laufmaschine to the chain-driven safety bicycle of 1885 and the pneumatic tire that followed shortly after. Each stage solved a specific problem left by the version before it, and that steady sequence of improvements is really the more accurate answer to when the bicycle was invented than any single date could offer on its own.
Introduction
A battery is the part of an e-bike that determines almost everything about how it performs day to day: how far it goes, how it charges, and eventually, what it costs to keep the bike running once the original battery starts to wear down. For anyone who owns a Heybike Mars or is troubleshooting a range or charging issue, understanding the battery itself is usually more useful than reading generic e-bike advice.
This guide covers what the Heybike Mars battery is, how it’s built, what separates the original Mars from the Mars 2.0 version, and what to know about charging, maintenance, and eventual replacement.
Direct Answer: What Is the Heybike Mars Battery?
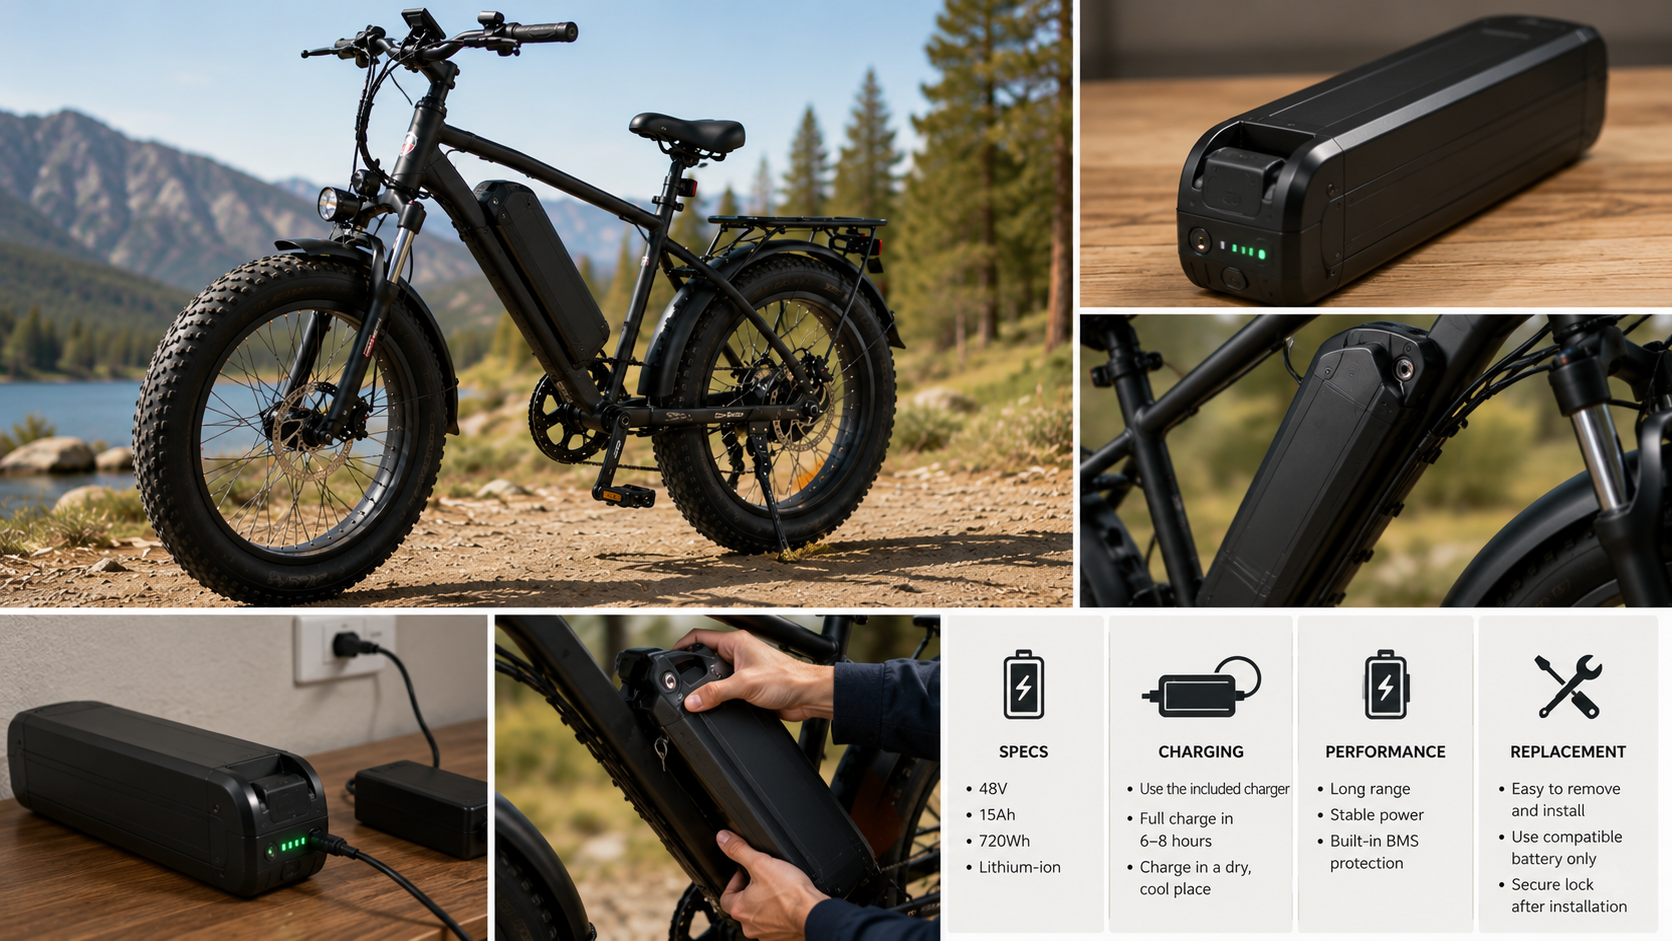
The Heybike Mars battery is a removable, lockable 48V lithium-ion battery pack that powers the Heybike Mars and Mars 2.0 e-bikes. The original Mars uses a 48V, 13Ah battery (roughly 624Wh), while the Mars 2.0 uses a 48V, 12.5Ah battery (600Wh). Both include a USB charging port and a physical lock, and both are designed to be charged either on or off the bike frame.
Why the Battery Differs Between Mars Generations
Heybike has released multiple versions of the Mars over time, and the battery specifications have shifted slightly between them. This matters because batteries from different Mars generations, and from other Heybike models entirely, aren’t necessarily interchangeable, even when the voltage matches.
The original Mars uses a 48V, 13Ah battery, translating to roughly 624 watt-hours of capacity. The Mars 2.0 uses a slightly smaller 48V, 12.5Ah battery, or 600 watt-hours. While the difference in capacity is minor, the physical size and shape of the battery housing can differ enough between models that a battery built for one won’t fit securely in another, even if the voltage is identical. Heybike has specifically noted this kind of mismatch between models like the Mars and Ranger, where similar voltage batteries still can’t be swapped due to differences in height and housing shape.
Key Specifications
- Mars (original) battery: 48V, 13Ah, approximately 624Wh
- Mars 2.0 battery: 48V, 12.5Ah, 600Wh
- Weight: Approximately 9.35 lbs (Mars 2.0 battery)
- Charging: Removable, can be charged on or off the bike frame
- Security: Lockable with an included key
- Extra feature: Built-in USB charging port for phones or small devices
- Charge indicator: Built-in level indicator on the battery itself
How the Battery and Charging System Work
Understanding a few basic concepts makes it easier to get accurate information when troubleshooting or comparing replacement options for the Heybike Mars battery.
Voltage, Amp-Hours, and Watt-Hours
Battery capacity for e-bikes is usually described using three related numbers: voltage (V), amp-hours (Ah), and watt-hours (Wh). Voltage reflects the electrical pressure the battery delivers, amp-hours reflect how much current it can supply over time, and watt-hours, calculated by multiplying voltage by amp-hours, represent the total energy capacity. A 48V, 12.5Ah battery equals 600Wh, which is the figure most directly tied to how far the bike can travel on a full charge.
Removable and Lockable Design
The Heybike Mars battery is designed to be removed from the frame, which serves two purposes. First, it allows the battery to be charged indoors or in a more convenient location rather than requiring the entire bike to be near an outlet. Second, the built-in lock reduces the risk of theft, since the battery can be secured to the frame separately from the bike’s main lock. Removing the battery for charging or storage is a normal part of regular use rather than something reserved for troubleshooting.
The USB Charging Port
Batteries used across several current Heybike models, including the Mars and Mars 2.0, include a built-in USB port that allows riders to charge a phone or similar device directly from the battery. This is a convenience feature separate from the bike’s main charging process and doesn’t affect the battery’s range or charging time in any meaningful way.
Charging the Heybike Mars Battery
Charging times for lithium-ion e-bike batteries generally depend on the charger’s output and the battery’s total capacity. Larger batteries, like the 12.5Ah to 13Ah packs used in the Mars and Mars 2.0, typically take longer to charge fully than smaller batteries found on lighter e-bikes, often in the range of several hours from empty to full, depending on the specific charger provided.
A few general charging practices apply to lithium-ion batteries like the one in the Heybike Mars:
- Avoid letting the battery sit fully depleted for extended periods, since this can shorten its long-term lifespan.
- Store the battery at a partial charge, rather than fully empty or fully charged, if it won’t be used for an extended time.
- Charge in a moderate temperature environment, since extreme heat or cold can affect both charging efficiency and battery longevity.
- Use the charger that came with the bike or a verified compatible replacement, since mismatched chargers can affect charging speed or, in some cases, battery safety.
Step-by-Step: How to Check and Maintain the Heybike Mars Battery
- Check the battery’s charge level using the built-in indicator before starting a ride, particularly for longer trips.
- Remove the battery using the key if charging it separately from the bike frame.
- Connect the charger to the battery, confirming a secure connection before leaving it to charge.
- Monitor charging progress periodically rather than assuming a full charge without checking, especially with an unfamiliar or replacement charger.
- Reinstall and lock the battery securely onto the frame once charging is complete, confirming it clicks or locks into place properly.
- Periodically inspect the battery housing and contacts for dirt, corrosion, or damage, particularly if the bike is ridden in wet conditions.
When to Consider Replacing the Heybike Mars Battery
Like all lithium-ion batteries, the one in the Heybike Mars has a limited lifespan measured in charge cycles, generally in the range of hundreds to over a thousand full charge cycles before capacity noticeably declines. A few signs typically indicate it may be time to consider a replacement:
- Noticeably shorter range than when the bike was new, even under similar riding conditions
- The battery failing to hold a charge for more than a short period after reaching full
- Visible damage to the battery housing, connectors, or wiring
- Inconsistent power delivery or unexpected shutoffs during riding
Replacement batteries are available both through Heybike directly and through third-party sellers offering Mars-compatible batteries. When buying a replacement, confirming the exact model, either the original Mars or Mars 2.0, along with matching voltage and physical dimensions, is necessary to ensure proper fit and safe operation.
Common Mistakes and Misconceptions
Assuming any 48V battery will fit the Heybike Mars. Voltage matching alone isn’t enough. Physical dimensions and connector types vary between Heybike models, and even between the Mars and Mars 2.0, so a battery needs to be confirmed as model-specific before purchase.
Believing higher amp-hour third-party batteries are always a safe upgrade. While some aftermarket batteries offer higher capacity than the original, compatibility with the bike’s controller and charging system matters more than raw capacity numbers, and mismatched components can create safety risks.
Ignoring battery storage practices during long periods of non-use. Leaving a lithium-ion battery fully depleted or fully charged for extended periods can accelerate capacity loss, which is a common and avoidable cause of reduced battery lifespan.
Assuming reduced range always means a battery replacement is needed. Range can also be affected by tire pressure, cold weather, higher assist levels, or rider weight, so it’s worth ruling out these factors before assuming the battery itself has degraded.
Using a charger not designed for the specific battery. Even chargers with similar voltage output can differ in current and charging profile, which may affect charging speed or, in some cases, battery safety over time.
Real-World Examples
A rider noticing reduced range after a year of daily use. Someone who previously rode 30 miles on a charge but now gets closer to 20 might reasonably suspect battery degradation, particularly if riding conditions and habits haven’t changed significantly.
A buyer confirming battery compatibility before ordering a replacement. Someone shopping for a replacement Heybike Mars battery would need to confirm whether they own the original Mars or the Mars 2.0, since the two use different capacity batteries that aren’t universally interchangeable.
A commuter charging the battery indoors overnight. Since the Heybike Mars battery is removable, a rider without convenient outdoor bike storage can bring the battery inside to charge separately from the bike itself.
Benefits and Limitations
Benefits
- Removable design allows convenient indoor charging
- Built-in lock adds a layer of theft protection
- USB port provides a useful secondary charging option for small devices
- Charge level indicator makes it easy to check status before riding
Limitations
- Not interchangeable with batteries from other Heybike models, even at matching voltage
- Mars and Mars 2.0 batteries differ slightly in capacity and are not universally interchangeable with each other
- Like all lithium-ion batteries, capacity gradually declines with use and age
- Charging time is longer than smaller-capacity e-bike batteries due to the larger pack size
Key Facts
- The original Heybike Mars uses a 48V, 13Ah battery (approximately 624Wh).
- The Mars 2.0 uses a slightly smaller 48V, 12.5Ah battery (600Wh).
- Both batteries are removable, lockable, and include a USB charging port.
- Batteries are model-specific and generally not interchangeable across different Heybike e-bike models, even at matching voltage.
- Lithium-ion battery lifespan is typically measured in hundreds to over a thousand charge cycles before capacity noticeably declines.
- Replacement batteries are available both directly through Heybike and through verified third-party sellers.
Frequently Asked Questions
What is the Heybike Mars battery?
It’s the removable, lockable 48V lithium-ion battery pack that powers the Heybike Mars and Mars 2.0 e-bikes, with capacities of roughly 624Wh and 600Wh respectively.
How does the Heybike Mars battery charge?
It can be charged either while attached to the bike frame or after being removed using the included key, giving riders flexibility to charge indoors or in a more convenient location.
Why do Mars and Mars 2.0 batteries have different specs?
Heybike updated the battery slightly between model generations, resulting in a small capacity difference. The two are generally not interchangeable due to differences in physical size, even though both use 48V systems.
Is the Heybike Mars battery safe?
The battery includes standard lithium-ion safety features common to e-bike batteries, though safe use also depends on using the correct charger, avoiding extreme storage temperatures, and replacing the battery if physical damage occurs.
Is it legal to replace an e-bike battery with a third-party option?
Generally, yes, though using a battery not designed specifically for the bike’s voltage and physical dimensions can create safety or performance issues, so confirming compatibility before purchase matters more than legality in most cases.
What are the alternatives if the Heybike Mars battery needs replacing?
Alternatives include purchasing a replacement directly from Heybike, which guarantees compatibility, or a verified third-party battery specifically listed as compatible with the Mars or Mars 2.0, confirming voltage, capacity, and physical dimensions before buying.
What should someone know before buying a Heybike Mars battery?
Buyers should confirm whether their bike is the original Mars or Mars 2.0, since the batteries differ slightly in capacity and aren’t universally interchangeable, and should verify that any replacement battery matches the original’s voltage, dimensions, and connector type.
Key Takeaways
- The Heybike Mars battery is a removable, lockable 48V lithium-ion pack, with slightly different capacities between the original Mars and Mars 2.0.
- Batteries are model-specific, and matching voltage alone doesn’t guarantee compatibility across different Heybike models.
- Proper charging and storage habits, like avoiding full depletion for long periods, help extend battery lifespan.
- Reduced range can result from factors other than battery degradation, including tire pressure, weather, and assist level.
- Replacement batteries are available directly from Heybike or through verified third-party sellers, provided the exact model is confirmed.
Conclusion
The Heybike Mars battery is a fairly standard removable lithium-ion pack, but the details, like the difference between Mars and Mars 2.0 capacities, or the importance of matching physical dimensions rather than just voltage, matter for anyone troubleshooting range issues or shopping for a replacement. Understanding how the battery charges, stores energy, and degrades over time makes it easier to maintain the bike’s performance and make an informed decision if a replacement eventually becomes necessary.
-
 E-Bike News4 weeks ago
What Is a Bike Stand? A Complete Guide to Types, Uses, and How to Choose One
-
 E-Bike News4 weeks ago
What Is an Elliptical Bike? A Complete Guide to How It Works, Benefits, and What to Know Before You Try One
-
 E-Bike News3 weeks ago
What Is a Beach Cruiser? A Complete Guide to Comfort Bikes for Easy Riding
-
 E-Bike Technology3 weeks ago
Pocket Rocket Folding Road Bikes: What They Are and How They Work
-
 E-Bike News4 weeks ago
Electric Commuter Bike: What It Is and How to Choose the Right One
-

 E-Bike News2 weeks ago
Sleeping on a Bike: Why It Happens and How to Stay Safe While Riding
-
 E-Bike News3 weeks ago
Types of Bikes: A Complete Guide to Choosing the Right One
-
 E-Bike Technology4 weeks ago
What Is a Sirrus Bike? A Complete Guide to the Specialized Sirrus Line